
Crafts, nails, and other things :)
Sunday, October 2, 2011
Camera Problems!
Wow! I havent posted in a whole month! I couldnt share any nail tut. because my camera's screen is blue and isn't working. And my mom lost her camera's charger so the camera won't turn on to take pictures! I will soon try to get a picture of the cherryblossom tree nail art, smiley faces, flowers, and maybe my nail polish haul and stuff for the month of september!
Wednesday, August 31, 2011
Nail Polish Organization, Nail Tools + Nail Polish Collection Part 2
First I'll show you a couple ways how to store your nail polish and stuff. Also pictures of what I have.
DIY Holder:


And the difference between my brush and the nail art polish brush:


DIY Holder:

Basically, You just have tiers by using boxes and cardboard. To fold cardboard, use your scissors and drag it in a line where you want to fold the card board. I used a bunch of packaging tape, hot glue wood work too. Make sure you have ledges so your bottles won't slide off.
Cheap Holder from Fleet Farm:

So this is just sort of a shelf thing.
 |
| My tools and supplies. |
 |
| My nail polishes. |
 |
| These were rocks that I put on a towel to walk on, all your nerves end in your feet so this is just like a massage. |
My nail tools p.2 : Brushes
 |
| I made these brushes my cutting them BTW. |
 And the difference between my brush and the nail art polish brush:
So as you can see, they are about the same, the one I made though is better.
Lastly, my second part of my nail polish colletion of august 2011:

and

Well, I hope you enjoyed my post!
Courtney :P
Sunday, August 28, 2011
Nail Polish Collection! #1
This is my nail polish collection which actually grew a lot before I posted this. So my newest ones aren't on here. And I was too lazy to add them because it's like 11PM.


First: Sinful Colors(SC)

Second: Sally Hansen(all kinds)

Third: NYC

Fourth: Kiss Nail Art and LA Colors Art Deco

Fifth/Lastly: Random "lonely" polishes

Yeah so hope you enjoyed my short post about my collection :D
Random Updates and Stuff :)
Hi, soon I'll do some more nail posts about tools, designs, and even a DIY nail polish holder(which can also hold your tools and stuff). Also I'll tell you that the next couple nail designs are: puppy paw prints and zebra stripes.
Also please if you like my blog or any posts please become a FOLLOWER!!!
Am I the only one that sees a video or post on something that got so many views and I think I could either do that too or do that better? Thats why I am sharing some of my craft ideas with you guys. (of course though some things on the internet give me ideas and then I change them to my own style and with what I have to make it my own) Thanks though for the people that do read my blog, I really aprreciate it.
Courtney <3
Tuesday, August 23, 2011
DIY dotting tool and 2nd nail tut.-Sparkly Purple Gradient/Fading Nails!
I want to show you how to make your very own nail dotting tool! :D You (or someone in your family) SHOULD have these things...
1st and small method- Get a bobby pin, and bend it! You can see the before and after pics.


Before After
2nd and a bit larger method- A sewing pin and a pencil with some eraser on it. Again before and after.


Before After
Extra Methods- end of a small paint brush, a ink less ballpoint pen, the toothpick (especially the ones with a flat end) , and tons more things. You can pretty much use anything that is small and round. Hope that helped :)
Okay, so now onto these purple gradient type nails! Obviously my fave color is purple but you can use any color(s) for this design. :)
Okay so first the polishes I used:

Ok (from left to right): Purple Diamond by Sinful Colors, Purple Pizzazz Frost by NYC, Disco Ball by Sally Hansen Extreme Wear, and my top coat Invisible by Sally Hansen Extreme Nails. Of course though you can use any colors. I used a sheer polish instead of glitter for gradient nails-oh well. (If you are using a glitter polish skip down to Method 2: "Gradient Way")
To get started ( sorry by the way that I don't have pics for all of the steps), Method 1:
"Blended Way"
1. Do 2-3 coats of Purple Diamond by SC on whole nail.
2. Mix SC with a little bit of NYC on paper. Paint 3/4 of your nails with that first mixture.
3. Do half of the mix SC and other half NYC so it should get a bit darker. Use this second mix on half of your nail.
4. Now do mostly NYC and just a little bit of SC, mix that and do that on your tips, it doesn't have to be perfect-just take your time.
5. Next, take a clear or purple glitter polish and do one thin layer over your nails to make it look more blended.
6. Lastly, to finish it off, do a clear top coat.

Method 2: "Gradient Way"
You need one colored glitter polish and top coat.
1. Do one thin coat of glitterpolish over 3/4 of your nail. Wait a minute for that to dry a little.
2. Do one coat of the same polish over 1/2 of your nail. Wait another minute.
3. Again do another coat of same polish over the tips of your nails.
4. Do seal it in and to make it look shiny, give it one top coat.

Okay sorry if this was confusing at all... but I hoped it helped you some at least :) Also, tell me if there is something you'd like a tutorial on or if you have any questions or comments.
Buh-Bye
~Courtney
Monday, August 22, 2011
Camera and First Nail Tutorial-Cheetah Print!
Okay right now my camera isn't working so I have used my sisters for this post! I did a cheetah pattern on her nails. You need 3 different colors of nail polish, a top coat, and a thin nail art brush like kiss, stripe rite, or art deco. If you don't you can also use a very thin paint brush and water based black or white acrylic paint.

Step 1: Do a base coat, the color should be light or dark and the spots being opposite. The color I used is Easy Going by Sinful Colors.


Step 2: Get a dotting tool(I will show you how to make one a bit later),drop some polish on paper, and make 4-6 dots on your nails. You can do one color for the spots or 2 like I did. For blue I used Aquamarine by Sinful Colors and for purple, Purple Pizzazz Frost by NYC.
Step 3: Get the black acrylic paint(or if you are using white)and brush to make little "c"s around the spots.
The paint i used was Black by Crafters Acrylic.

After you do this to all your nails, finish with a top coat so the paint doesn't come off easily and so everything looks shiny! The top coat I used is by Sally Hansen Extreme Wear. You should come out with something like this.


I hope you enjoyed! I will try to soon get a tutorial or something about how to make a naill dotting tool, maybe later today :D
Saturday, August 20, 2011
Sorry and nails!
OK, i have no idea how long i haven't been on here! Sorry but i will try to get some more posts up soon!
Also, I recently have started doing my nails a lot and doing cute designs! I am right now obsessed! I hope to soon do posts of my nails and my mom's nails because i do her nails every now and then.
Bye for now. Courtney :)
Also, I recently have started doing my nails a lot and doing cute designs! I am right now obsessed! I hope to soon do posts of my nails and my mom's nails because i do her nails every now and then.
Bye for now. Courtney :)
Thursday, May 19, 2011
DIY Earring Holder
This is another jewelry holder project. it's an easy and cute way to hang your earrings! The few items you need to make this are:


 If you want to embellish, plug the hot glue gun in and glue on whatever you'd like. I did a big flower with fake pearls inside and stones around the frame.

- A frame ( any will do, you can get cheap ones at the dollar store. If you have a lotta earrings-you need a big picture frame )
- hot glue gun(optional)
- staple gun
- mesh like material or other thin material
- any embellishments you want(optional)
- optionally, clothespins to hold the fabric onto the frame while stapling.

First you're gonna take your frame, take off the back and glass-you don't need this,and material. Pin the fabric all the way around the edge with clothespins. Get your staple gun and staple all the way around close to each other pulling the fabric tight. Once you are done, you can stop here or keep going.

 If you want to embellish, plug the hot glue gun in and glue on whatever you'd like. I did a big flower with fake pearls inside and stones around the frame.
 This is the back of one of mine.

When you are done, simply poke the earrings through and put the stud on in the back. Either hang this or just lean it on a desk or vanity.

Monday, May 16, 2011
DIY Jewelry Holder
Hey, the truth is for girls, we all have jewelry-some way more than others :P.You are probably very tired with the jewelry all over and/or getting tangled.Also, I'm just redecorating my room :) .This craft can hold rings, bracelets, or necklaces but not earrings(but don't worry because I'm gonna show you how to make an earring holder in another post!))Anyways, this is what you can make! And all of this is probably free for you! You will need:
- a shoe box lid
- wooden clothespins(amount depends on how much jewelry you have)
- hot glue gun with about 2 sticks(mine is a mini glue gun)
- sharp scissors
- And any embellishments (like stickers or pictures, you probably don't want anything thick like fake flowers or you wont have room for your jewelry)
 First, take your shoebox lid and start seeing where you want to put your "hooks/pegs". I had 10 which is 5 clothespins. You could divide it into a necklace area, bracelet area, and a ring area. To make your pegs, take a clothespin and twist it like in the picture separating them, you don't need the metal piece.
 (sorry I don't have any pics)Take your scissors and poke holes where you want your pegs to be. Next, poke in one half of the clothespin, the flat side goes on the bottom. Also, the clothespin has bumps and one end is pointy, put the pointy end on the "wrong" side of the shoebox and stop inserting in when it locks at a bump(look at the picture if you are confused).Secure this with hot glue on the back of the box lid so you don't see it.
 After you have repeated with all the pegs and are now done, you can decorate, hang jewelry, and get something sorta like this. Hope you enjoyed this project!
:D
Sunday, April 24, 2011
Easter
Happy Easter, everybody! I made a bunch of eggs, made heads, animals, and a cool ladybug! What did you guys make? Well, sorry I didnt have any crafts for Easter, but I do have an idea for the leftover dye you used for your eggs. This is a very easy craft, you will need:
Later, once all the salt/sand is dry, pour them into your small bottle layering the sand. A cool idea is try to make a rainbow in a bottle. Enjoy!
- sand or salt
- leftover dye(s) (or if you have any, food coloring)
- a paper/plastic cups or paper/plastic plates
- a stirring stick or any silverware
- a tiny bottle-I use a empty paint bottle.
Later, once all the salt/sand is dry, pour them into your small bottle layering the sand. A cool idea is try to make a rainbow in a bottle. Enjoy!
Friday, March 18, 2011
Smoothies!

A couple days ago, we bought a bunch a fruits so we made some delicious smoothies! We put strawberries, bananas, and some cantaloupe! Yum! Some other ideas are
- strawberries and bananas
- strawberries and sorbet
- strawberry kiwi
- strawberry lemonade or raspberry lemonade
- also a smoothie with peanut butter, vanilla ice cream or yogurt, chocolate, and half a banana is super delicious!
Dreamcatcher
I have always wanted to make/have a dream catcher, but I never had anything to use as the base because I didn’t want to use a twig. So, I have come up with this! All the supplies you need to make this awesome dream catcher are: 
 First,(If using hot glue for "twig" part do following, otherwise skip this step) get the magazine and have your glue gun heated, get something that is the size of a circle or free hand draw a circle and trace line with glue. Make the width about half an inch or so. Let the glue dry and peel off, if you used a magazine its ok if it doesn't come off, just peel off as best as can, that will become the back. Then paint it brown, or of you want to make it a little funky paint it a different color like yellow, purple, pink, blue, etc.
 Next, you might want to pick a front and back, you don't have to though. Get any colored string, twine, or yarn and knot at one end leaving a "tail" to tie the dream catcher onto. Make a pattern with string, make one up or look one up(sorry I don't have a pattern)While you do the pattern add beads and/or make knots.

 Then, get your feathers and you add another string on one side at the bottom, add a bead or two then tie or glue on a feather. Go to the middle and if you want just do one bead or vice-versa. Lastly, do the other side. Also, if you don't cut the string at the feather and let it keep going a little, add one or two beads. Use feathers you found or bought, or craft feathers(which are bought).

- hot glue gun and 2-3 glue sticks, a twig, a metal hoop, or a preserved twig(PICK ONE)
- scissors
- feathers
- string
- paint
- hot glue gun
- beads
- wax paper or magazine

 First,(If using hot glue for "twig" part do following, otherwise skip this step) get the magazine and have your glue gun heated, get something that is the size of a circle or free hand draw a circle and trace line with glue. Make the width about half an inch or so. Let the glue dry and peel off, if you used a magazine its ok if it doesn't come off, just peel off as best as can, that will become the back. Then paint it brown, or of you want to make it a little funky paint it a different color like yellow, purple, pink, blue, etc.
If using a twig, read this step, if not skip it. Bend the twig to make a circle and use a this wire at ends to secure it. (wrap around both ends trying to connect otherwise just glue it)
If you have a metal hoop, just paint it brown or a different color to make a sorta funky dream catcher.
 Next, you might want to pick a front and back, you don't have to though. Get any colored string, twine, or yarn and knot at one end leaving a "tail" to tie the dream catcher onto. Make a pattern with string, make one up or look one up(sorry I don't have a pattern)While you do the pattern add beads and/or make knots.
 Then, get your feathers and you add another string on one side at the bottom, add a bead or two then tie or glue on a feather. Go to the middle and if you want just do one bead or vice-versa. Lastly, do the other side. Also, if you don't cut the string at the feather and let it keep going a little, add one or two beads. Use feathers you found or bought, or craft feathers(which are bought).
Finally tie your finished dream catcher somewhere near your bed! Sweet dreams!
Monday, February 28, 2011
How to make an easy weaving loom

Do you know how to finger knit? But, do you want it bigger? OK, this can help. Get a
- TP roll
- hot glue gun and sticks
- paint (optional)
- Popsicle sticks ( 5-10 )
Monday, February 21, 2011
Water bottle pen/pencil holder

This is a recycled water bottle made into a pencil/pen holder. The "ingredients" you need are;
- Water bottle(any type)
- scissors
- fabric, flowers, foam letters, jewels, markers, etc.
- Hot glue gun ( if gluing anything )
Sunday, February 20, 2011
Jewelry Stand

Good afternoon! Is your jewelry everywhere, is it all messy, unorganized, or have you lost a set? Well I think this can help solve your problem(s). You will need the following:
- Plastic or glass cup or wine glass
- Beads(optional)
- flowers(optional)
- hot glue gun and sticks
- saucers
You should plug in your glue gun. Get your cup or glass and glue it face down on first saucer. (decorate inside glass with something like flowers). Glue saucer on top. If you want, line beads on edges. Now glue next cup if you want another on top. Whatever your top is, decorate with flowers. Pain anything you want, etc. Enjoy with this cute little jewelry organizer!
Macrame Spiral Bracelet

Hello! Sorry I haven’t been on here for a long time! But, anyways now I’m gonna tell you ( as best as I can ) how to make a macramé bracelet.
The things you will need
· Hemp cord (or just string it will be a thinner bracelet)
· Scissors
· Clipboard and tape or wood and nail
· Beads
· And big bead( preferred but optional )
So first, get scissors and string and cut four 3ft pieces. At one end make loop and put under clip on clipboard otherwise put loop on nail. Next, find the two side strings and put them on side, find two middle strings and tape at bottom on clipboard/table or whatever your woodblock is on.
Ok, so for the knotting it will be very confusing to understand but doing is super easy. Pick a side not a string, and make a big loop making a C, placing on top of two middle strings. Take opposite sting and put on top of tail of loop, under two middle strings, and pull up through loop. Repeat doing this with same side not string, a spiral should appear.
When you want to put a bead, remove tape and put bead through middle stings. Putting wax may help, if still not working, just put one string through hole of bead. Do the same knots and just keep repeating til you want to put another bead. Do same process.
When you are done with your bracelet, tie a big bead with big hole through both middle strings and tie knot, any type. Now, when you wear the bracelet, put loop over big bead on other end and it should stay pretty secure.
Enjoy! Comment if you still don’t get it, otherwise just look up a video.
Sunday, February 13, 2011
Valentines Day and Cards!

Hey Happy Valentines Day everyone! I'm sorry I'm posting so late but, now I am... Here are Valentine's cards
- any types of hearts
- gems
- ribbon
- flowers- a ton!
- hot glue gun
- glue stick
- construction paper
- paint
- stamps
- scissors
- pom poms
- tissue paper
- glitter
- buttons
- markers
- creativity with some love!
Friday, February 11, 2011
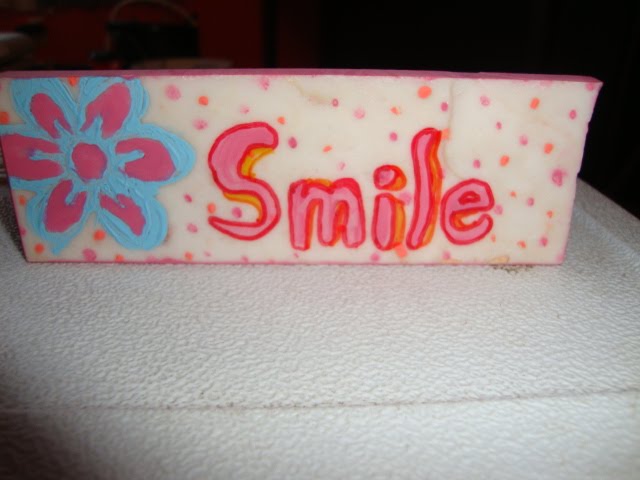
Block saying (or whatever you wanna call it)
Hey, it's almost Valentines Day! What crafts are you making? Well anyways, let me show you this craft! It is just an extra piece of marble. You can use:
markers Sharpies, and a flower stamp. Pretty much all you do is color it, decorate it, and either write a little message or phrase or write a very strong word-I only did smile though :)
- wood
- marble
- tile
- etc.
Thursday, February 10, 2011
Egg Carton (jewelry, craft, or other) Box

Make this cool box to hold all your little things! There are lots of spots and and you can hold anything you want in it! I love this, I use it big time for all my little embellishments and other stuff. First you will need:
- empty egg carton(not broken)
- construction paper
- markers
- jewels, buttons, beads, etc.
- glue ( if decorating with construction paper )
- whatever else you want...
Subscribe to:
Comments (Atom)